

Preparing for a mountain bike outing
No one wants to find themselves on a trail that's too difficult, where the only way out is to walk alongside their bike. For a pleasant experience that lives up to your expectations, you need to know the rules of the road to plan your route properly.
In Quebec, mountain biking is generally practiced on groomed trails. Whether free or paying, network management teams are encouraged to classify their trails by level of difficulty, based on the Vélo Québec Classification Guide, developed with partners from the Quebec mountain bike community.
What is the trail classification code?
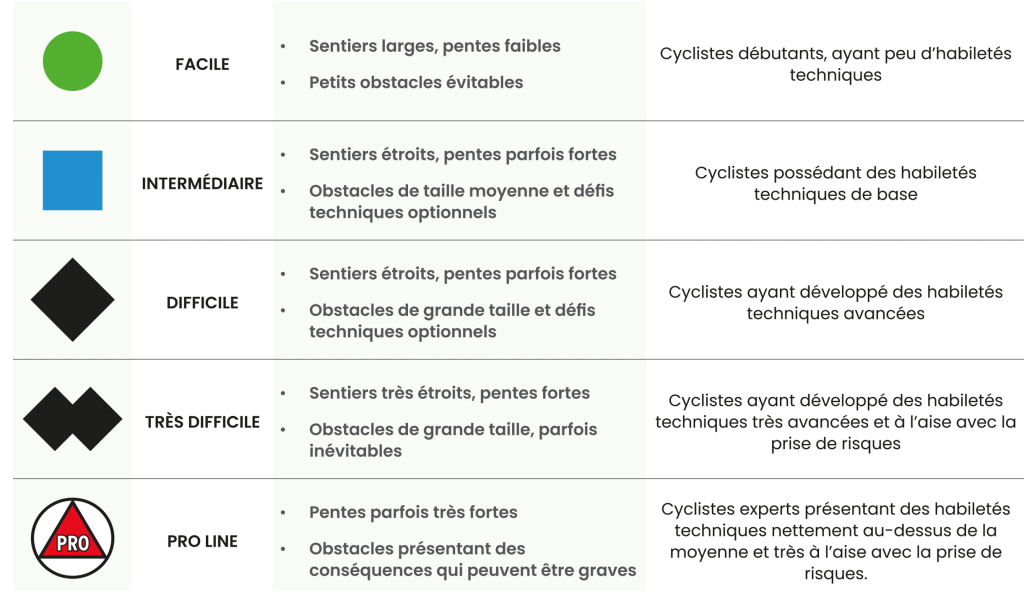
It's a system of colors (green, blue, black, red) similar to those used in skiing, which indicates a trail's level of difficulty.
The classification code helps mountain bikers to choose courses adapted to their skills and experience.
Classification is a way of clearly communicating a trail's level of difficulty to users. There are nuances depending on the type of practice (cross-country, enduro, downhill), the region (sandy terrain, clay, rocky headlands, etc.) and the center.
What difference does the type of trail make?
It's a way of indicating the type of experience the trail offers and the skills needed to ride in complete control. Several networks specify their classification code by adding information on the type of trail layout:
- a broken line for the natural terrain
- a broken line for worked ground
- an orange oval to identify the presence of jumps

A natural trail is one that has been laid out mainly using hand tools. The result is a more irregular, narrower and more sinuous surface than a mechanically worked trail. Roots, rocks and natural obstacles are more prevalent. This type of trail develops riding skills.

A worked trail is a trail built, for the most part, using mechanized equipment. Its surface is compact, stable and even. It is generally free of roots and rocks. This type of trail, known as fluid, may include natural or built obstacles. This type of trail develops turning and braking skills.

The free trail or jump line is a trail generally laid out using mechanized equipment, made up of modules and/or built obstacles optimized for jumping. This type of trail develops jumping skills.

To choose a site or sector that matches your desired experience, it's a good idea to analyze various information concerning the general description of the network, such as :
- type of trail (natural, worked, jumps),
- their classification (easy, intermediate...)
- the height difference,
- lift options, both mechanical and non-mechanical.
If in doubt, contact the network's customer service department directly.
Once on site, we recommend that you refer to the trail progression chart drawn up by the center. This chart visually illustrates the trails, ordered from easiest (top) to most difficult (bottom). It can be used to refine the degree of difficulty within a given level, and to determine, for example, which trail is the most accessible among others of the same level.
Define your itinerary
Consult the trail map on site, on the center's website, in the Vélo Québec directory or in a navigation application such as Trailforks and Ondago to plan a route according to your abilities. Ideally, identify quick exit points to return to the reception if necessary.
Before making your choice, it's important to check whether the trails are open and what access fees are payable.
When discovering a new network, a good practice is to start with an easier, shorter track to warm up. Some networks have a practice run or skill park to test your skills and evaluate your level in complete safety. Progression facilities also help you to assess your level correctly.
Incident procedures
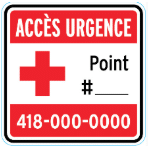
Knowing how to find your way on the trails is essential for communicating your precise position in the event of an evacuation. Many networks indicate emergency zones on their maps and mark them out on the ground.
Each beacon displays an emergency number to call, as well as its own number, which can be passed on to emergency responders to quickly locate the injured person (or the contact person who will guide the rescue team). When a beacon is encountered, note its location. If a map with beacon locations and emergency instructions is available at reception, take a photo of it and keep it on your phone. Before setting off, take note of the procedures to follow in the event of an incident: some centers have an in-house patrol, others call the emergency services (911).
Fundamental sign posted at ticket booths, reception desks or trail entrances. It can also be found at various gathering points or potential danger zones.


