Positioning on the bike

Our positioning on bicycles is a the key to comfortable, efficient riding. Find out how to adapt your bike to your body type.

Bike size

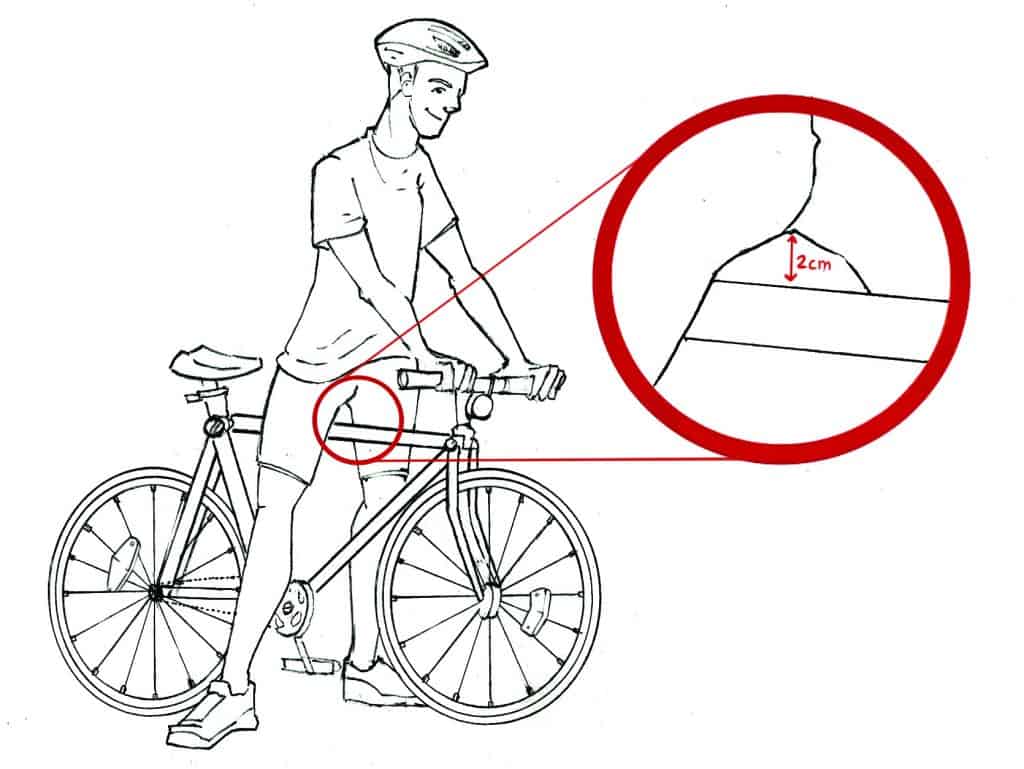
The size of the bike should be adapted to the rider's height and morphology. A bike that's too big or too small is difficult to control, and the rider risks tiring more quickly and even injuring himself. Inseam height is the key factor in choosing the right frame size. This measurement corresponds to the distance between the ground and the perineum. To check if the bike is the right size, simply get on the bike with your feet flat on the ground. With shorts, there should be a two-centimeter gap between the crotch and the horizontal tube.

Size

Basic ergonomic adjustments

Various ergonomic adjustments can be made to the bike to ensure comfort and prevent injury. With thousands of pedal strokes a day, inadequate adjustment can lead to a variety of aches and pains, and even injury. The main elements to adjust on a bicycle are the saddle and handlebars.

The advice given in this section is intended as a general guide to bicycle adjustment. However, cyclists can also make other adjustments to suit their comfort on the bike.

Saddle height

Saddle height
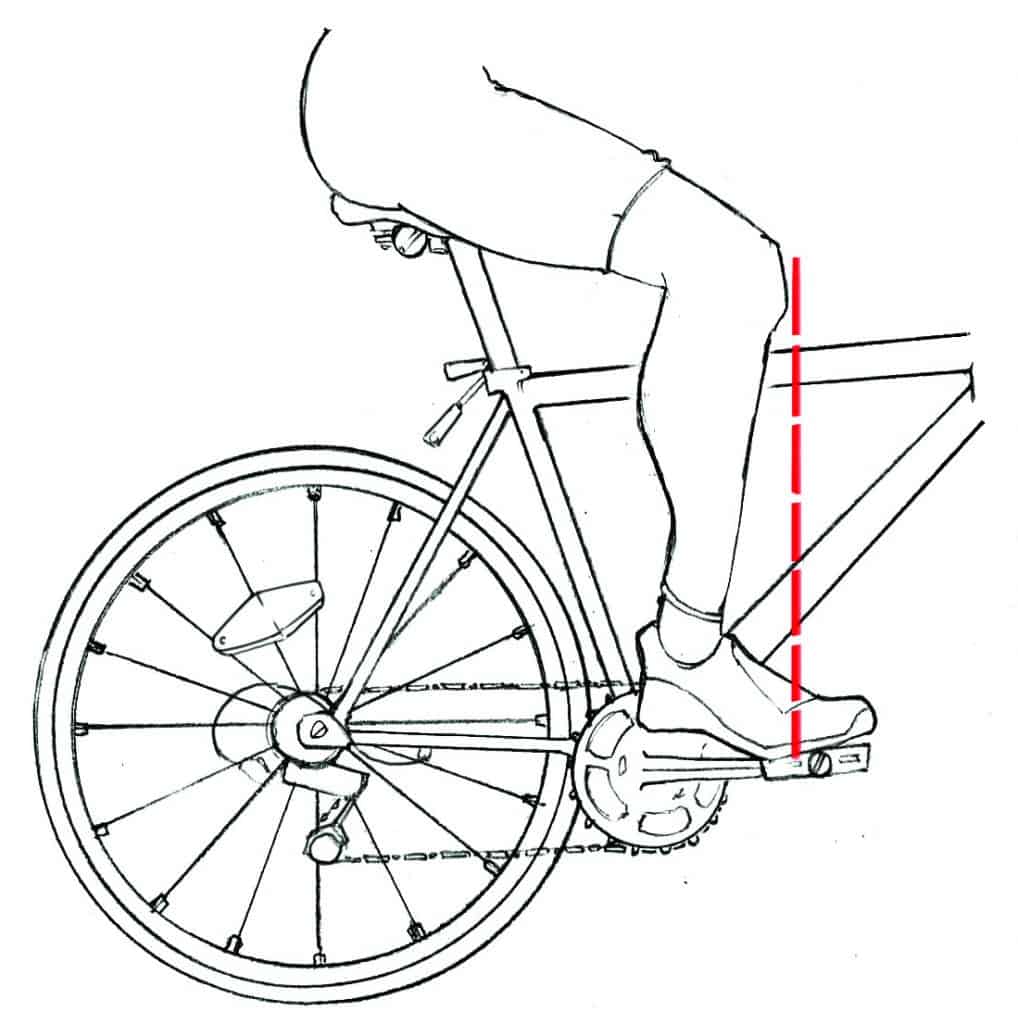
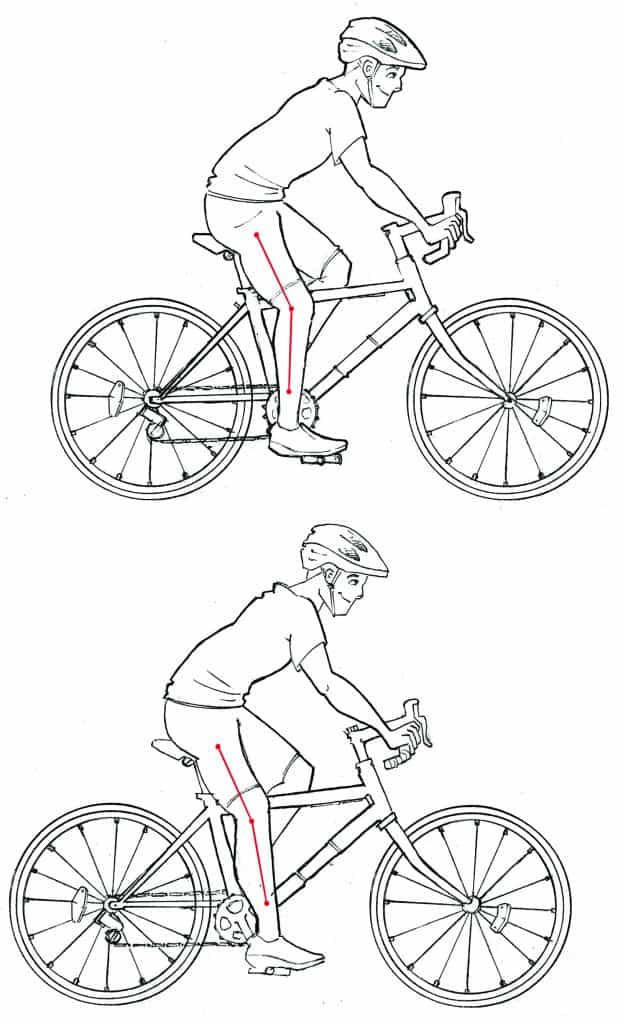
Adjusting the saddle height is important: a saddle that's too low can lead to back and knee pain, while one that's too high can cause swaying, joint pain and fatigue.

To determine saddle height, the rider must be seated on the saddle, with the pedal positioned in line with the saddle tube.

Saddle height is adequate when it allows almost full extension of the leg when the heel is placed on the pedal and slight flexion of the knee when the forefoot is placed on the pedal.

Saddle angle

The saddle should be parallel to the ground or slightly inclined forward, depending on comfort. However, care must be taken to ensure that the saddle is not tilted too far forward, as this could cause the rider to slide forward, putting pressure on wrists, hands and arms.

Horizontal saddle movement

Proper horizontal adjustment (sufficiently forward or backward position of the saddle) provides greater comfort and power, as it allows you to work the muscles in the back of the leg more effectively. To adjust the horizontal position of the saddle, use the adjustment device under the saddle to move the saddle forward or backward. The technique involves using a leaded wire. The rider should be comfortably seated, with feet firmly planted on the horizontal pedals. Hold the end of the wire in front of the knee, just below the kneecap. The weight must fall vertically in relation to the pedal axle.

Saddle angle

Handlebar height

There are two types of handlebars: curved on road bikes and straight on most hybrid and mountain bikes. Straight handlebars give you a clear advantage in town: a more upright position and better peripheral vision. Curved handlebars, on the other hand, allow you to adopt different positions depending on the situation, and provide a lower, more aerodynamic riding position.

Once the saddle has been adjusted, the handlebars are adjusted next. Handlebar height can be adjusted by sliding the stem up and down the head tube. When seated on the saddle, the rider should be able to comfortably hold the handlebars while maintaining a slight flexion in the elbows. If the rider has to stretch to reach the handlebars, this can cause upper back and shoulder pain.

The correct handlebar height depends on the type of bike, the rider's flexibility and the riding environment (urban/road). The basic rule for adjusting handlebar height is simple, and applies to all types of cycling, including cycle touring: the handlebar (where you rest your hands) should be at the same height as the saddle or slightly lower, but never higher than the saddle.

On the other hand, when riding in town or with an urban bike, the handlebar height may be slightly higher than the saddle to improve visibility. On the other hand, when riding on the road or with a sport bike, the handlebars can be set slightly lower than the saddle, to adopt a lower, more aerodynamic position.

Stem length

Seated firmly on the saddle, with hands on the brake coils, in the lower handlebar loop (curved handlebars) or on the grips (straight handlebars), arms and trunk should form a 90-degree angle, as in the image below. In this position on the bike, the handlebars should hide the front wheel hub from the rider. If this position is not achieved, consider replacing the stem with a longer or shorter one, as the case may be.

Stem length

Handlebar angle

On a road bike (curved handlebars), the wrist should never be in a bent position when the hand is resting on the handlebars. An angle of 10 to 15 degrees is recommended. Straight handlebars are easier to adjust, as they have no angle. On the other hand, adjusting the end pieces on the right handlebar should enable the rider to grasp them without bending the wrist. The angle of the brake levers on both curved and straight handlebars also needs to be adjusted to adopt the most comfortable position.

Handlebar width

Handlebar width should correspond approximately to shoulder width. The adequacy of the handlebar width can be assessed by ensuring that the arms are parallel.

N.B.: If the rider's position is not ideal after this final adjustment, some parts may not be adapted to the rider's morphology and may need to be changed (e.g. a longer or shorter stem, different handlebar sizes, etc.). You should not, however, modify the saddle adjustment in an attempt to obtain the ideal position on the bike.

Footrest adjustment

Foot pegs immobilize the foot on the pedals, providing additional stability when climbing, for example. Placed correctly on the pedal, the foot can work in push and pull without moving, which makes grinding easier and more efficient. There are two types of footrest:

Pedals with automatic cleats are directly attached to the bicycle shoes and ensure better energy transfer from rider to pedal. Cyclists should allow for a short period of adaptation to be able to easily attach and detach themselves from the pedals. Like all mechanical parts, automatic pedals need to be maintained in order to work properly (e.g. lubricate the pedal mechanism).

Strap footrests are inexpensive and allow the cyclist to wear his or her usual footwear (preferably stiff-soled shoes that can be easily inserted and removed from the footrest). To be effective, straps must be tight enough to allow the foot to pull well on the pedal, while leaving enough space to remove the foot when stopping. Care must be taken to ensure that the strap is not too tight to avoid numbness.
This type of cleat allows greater freedom of foot movement, which makes them slightly less effective than automatic pedals.

Whatever type of footrest you use, you need to make sure it's properly adjusted to avoid joint injuries and accidents. It's advisable to call in a professional to do the fine-tuning. In town, we recommend that you do not over-tighten the footrest straps, nor adjust the tension on the automatic pedals so as to be able to remove the foot in the event of a sudden stop. On the road, straps can be tightened a little and pedal tension raised a little.

To get the most out of your toe-clips, you need to ensure proper foot positioning: the metatarsophalangeal joint of the big toe should be directly above the pedal axle. With automatic pedals, the cleats can be adjusted to achieve this position. For toe-clips with straps, choose the right size (P, M, G, TG).

Footrest

Details: checking children's bikes and beginners' bikes

For beginners and children, it's particularly important to check that the size of the bike and the adjustments are adapted to the rider's height. Frames that are too large impair balance on the bike and can be the cause of accidents and injuries, especially among children. It is therefore important to ensure that cyclists are able to maneuver their bikes, touch the ground when stopping and easily reach the brake levers with their fingers.

For beginners or children, the saddle can be adjusted so that the rider's feet can touch the ground at all times (i.e. lower than usual). Although this adjustment may be uncomfortable, it will help build confidence and prevent the risk of falls when stopping. We'll return to the standard fit as soon as possible.

Read more in Vélo Mag

Positioning: as if in slippers

Read more in Vélo Mag

Bicycle pain

×